Supplies used: MME L&F Market Street, FP Winterland Paper, Spellbinders Lacey Circles, Spellbinders Creative Page TAbs, Twine, Unity Be Mine EP Stamps, CTMH Chocolate Ink, Distress Ink
Showing posts with label FP paper. Show all posts
Showing posts with label FP paper. Show all posts
Friday, May 3, 2013
Mini Tag Album
I am making a mini album similar to the one I made for my husband for Christmas, part of the album includes smaller mini albums to fit in the pockets. This is a small tag album to hold wallet size photo's, the album is almost done and when it is ready I will post the entire project.
Supplies used: MME L&F Market Street, FP Winterland Paper, Spellbinders Lacey Circles, Spellbinders Creative Page TAbs, Twine, Unity Be Mine EP Stamps, CTMH Chocolate Ink, Distress Ink
Supplies used: MME L&F Market Street, FP Winterland Paper, Spellbinders Lacey Circles, Spellbinders Creative Page TAbs, Twine, Unity Be Mine EP Stamps, CTMH Chocolate Ink, Distress Ink
Saturday, April 27, 2013
Mini Album
I have been meaning to post this project for awhile but it took me awhile to find the pictures. I made this mini album for my husband as a Christmas gift, I took pictures before I added photo's. It would have been nice to get photo's standing up of the pages but I was sneaking around trying to get this done. One thing I noticed is that I didn't take a photo of the slide out photo mats. Watch the video and you can see more of it, this album was inspired by a Paper Phenomenon brag book, I got the binding idea from this video, and the cover from fellow DT member Kathy Clayton. This was my first time attempting anything this complicated and I loved how it turned out.
Here is the video I made of the album on YouTube
Here are the photo's of the pages, next time I will make my husband help prop it up for the photo's but this time I couldn't.
Supplies used: DCVW Be Mine, FP Winterwonderland, Spellbinders Create Page Tabs, Spellbinders Scallop Hearts. Spellbinders Hearts
Monday, April 15, 2013
Easter Baskets Continued
I just realized that my post didn't go as scheduled so I apologize for a late Easter post but here is another basket. When my three year old son saw the basket I made for my daughter and her friend he asked for one too. This one was a bit of a challenge since I knew flowers were out of the question and I didn't want to make it too dimensional because he would likely take stuff off. Hopefully he keeps the stars on but time will tell.
Supplies used: Fancy Pants Lilac House Paper, Spellbinders Stars, Distress ink
Supplies used: Fancy Pants Lilac House Paper, Spellbinders Stars, Distress ink
Sunday, January 27, 2013
Sliding Card Pocket
I have been recently organizing my craft space and one of the things I realized is that I have too much paper. I also know how much my daughter loves getting cards from me so what I have been doing is making her some simple cards. I have been taking some scraps and papers that I have lots of and making her cards for her lunch. She loves getting them and I get the satisfaction of using some paper. I have a long way to go but its part of my plan to make a dent in the stash.
I also made an iGram if you are interested in seeing how I made it.
I also made an iGram if you are interested in seeing how I made it.
Monday, January 21, 2013
Faux Chipboard Tutorial with Cameo
When I saw the the theme was Ice I thought of iridescent paper and bling, two of my favorite things. I have always love the look of chipboard but the only drawback of the Cameo is that it can't cut chipboard, plus it's hit and miss on the acid free content. I decided to layer four of the same die cut to achieve the dimension of chipboard and this way I know the end result is acid free.
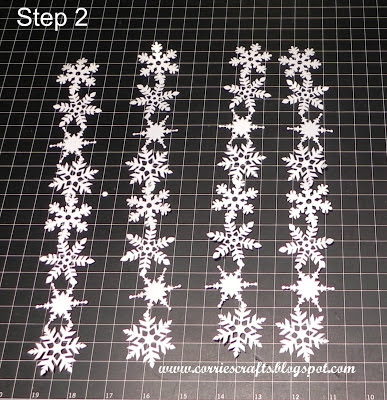
Step 2: Carefully remove the design from the mat and line up how you will use them, if your paper has a good and bad side make sure you have the right side up

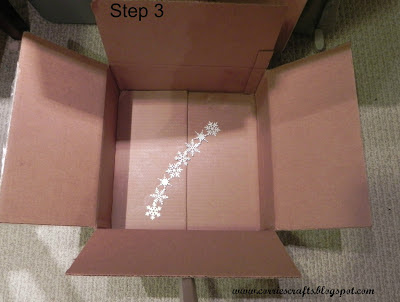
Step 3: Apply a re-positionable spray adhesive, use a spray for a light even coverage and re-positionable will give you some flexibility when matching the layers before setting permanently. Note because spray adhesive tends to splatter do this outside or in an empty box.

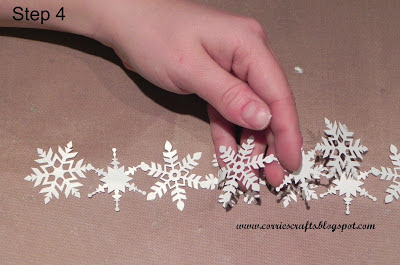
Step 4: Carefully match the layers up and press down, repeat for all layers. Note the more intricate and delicate the design the more difficult this will be. I sometimes use 5 layers but this design was intricate and it was getting difficult to keep everything together so I used four.

Step 5: Embellish as desired and attach to your project (I added some bling with the I-roc)
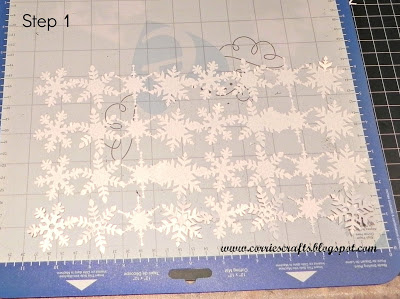
Step 1: Modify and size your shape as necessary and then cut four times, in my case I merged the design twice and then copied it four times. The more layers you add the more dimension you will get but if your design is very intricate and detailed it gets harder to match each layer.


Step 2: Carefully remove the design from the mat and line up how you will use them, if your paper has a good and bad side make sure you have the right side up

Step 3: Apply a re-positionable spray adhesive, use a spray for a light even coverage and re-positionable will give you some flexibility when matching the layers before setting permanently. Note because spray adhesive tends to splatter do this outside or in an empty box.

Step 4: Carefully match the layers up and press down, repeat for all layers. Note the more intricate and delicate the design the more difficult this will be. I sometimes use 5 layers but this design was intricate and it was getting difficult to keep everything together so I used four.

Step 5: Embellish as desired and attach to your project (I added some bling with the I-roc)
Products Used
- Evergreen Borough Distress Ink
- Snake Tape
- Cameo
- Winterland Collection pack by Fancy Pants
- I-Roc
- Spray Adhesive
- Iridescent paper
Wednesday, December 12, 2012
Crop Chocolate Challenge # 41
The current challenge at Crop Chocolate is to create something using three different hearts. I am currently working on a mini album as a Christmas gift, and when I saw this I figured I could make something for it. This is a journalling tag to go in my album and after Christmas I will upload a video and pictures of the finished project.
Supplies used:
- FP Winterland Paper
- Spellbinders Hearts
- Spellbinders Ornate Artisan Tags and Accents
Friday, May 25, 2012
Memorabilia Pocket
This month we were given a picture to use as our inspiration, the picture was drawn by Amber's daughter. She is such a cutie and when I saw the picture the red color stood out to me the most. I remembered my daughter's school picture and picked the paper from there.
It also reminded me that I have a ton of art work from my daughter and I thought making a memorabilia pocket to go with her school picture would be a great way to store it. Here is the project, I made a title on the pocket with her grade, school and the year but I just didn't feel comfortable putting that on my blog. Here is the pile of stuff I had.
Directions:
4. Take a bone folder and crease the score marks
5. Decorate the pocket on the outside
Supplies used:
FP Winterwonderland paper
Snake Tape
MS Swirling Lace punch
It also reminded me that I have a ton of art work from my daughter and I thought making a memorabilia pocket to go with her school picture would be a great way to store it. Here is the project, I made a title on the pocket with her grade, school and the year but I just didn't feel comfortable putting that on my blog. Here is the pile of stuff I had.
I decided to use a version of the pockets I use to store birthday and Christmas cards for my daughters important school work, I put her class picture and report card in here as well.
Here are the tutorial on how to make it:
1. Cut a piece of cardstock to 12 x 6"
2. Score the cardstock at the 1/2" mark on the two short sides and one long side
Directions:
3. Draw a line on the 45 degree angle on the bottom corners, cut these off. By cutting thes
miters the bottom corners will lay flat
4. Take a bone folder and crease the score marks
5. Decorate the pocket on the outside
6. Add strong adhesive to the flaps and adhere to the bottom of the page
7. Finish decorating page and fill with memorabilia Supplies used:
FP Winterwonderland paper
Snake Tape
MS Swirling Lace punch
Saturday, February 18, 2012
Dahlia Fold Flower Card with a lot of Bling
I made this card for the Crop Chocolate Challenge # 3. We were challenged to use simple shapes to come up with another shape. I haven't made an dahlia fold flower in a while and that is what popped in my head when I saw the challenge. My original intention with this card was to leave the inside blank so that way when I needed a card I could quickly add a sentiment and I would be good to do. Well my sweet five year old daughter saw the card while I was taking pictures and asked ever so sweetly if she could have it. After I said yes she decided that there wasn't enough bling (there is no such thing to a five year old). So she went to her "stash" and added some more embellishment.
I have to admit at first my jaw dropped when I saw how many pearls she was putting on it, but I like her version a lot. I really need to take a lesson from her, sometimes I don't want to use supplies I really like and save them for that perfect project. Her philosophy seems to be that if you like it use it, and use lots of it there will always be something else (usually something of mine). When I posted this over at crop chocolate she good lots of good comments and she really enjoyed me reading them to her. She is quite proud of this card, and has graciously agreed to let me scrapbook it.
Here is my version of the card
Here is hers
I have to admit at first my jaw dropped when I saw how many pearls she was putting on it, but I like her version a lot. I really need to take a lesson from her, sometimes I don't want to use supplies I really like and save them for that perfect project. Her philosophy seems to be that if you like it use it, and use lots of it there will always be something else (usually something of mine). When I posted this over at crop chocolate she good lots of good comments and she really enjoyed me reading them to her. She is quite proud of this card, and has graciously agreed to let me scrapbook it.
Subscribe to:
Posts (Atom)


