I just wanted to share a quick video of one of my favorite new things for 2011 and that is my Cutterpillar Pro Trimmer. It is such a great trimmer and I have gone through so many trimmers over the years I was so excited when I got this one. I love the edge light that lets me see where I am cutting, I honestly don't don't know how I lived without it. One of my favorite things about it is the blade, it has a lifetime warranty and cuts so smooth. It also has rotary blade so I don't have to worry about little fingers getting hurt by leaving it out. It can cut through chipboard which I know can be a death knell to other trimmers, but the best thing about it is how accurate it cuts. It cuts super straight, and cuts the tiniest slivers off your paper they will curl. When I got the trimmer it was a new thing out from a new company and too be honest I was a bit worried about it living up to my expectations but it has exceeded them. Here is a link to a quick demonstration of the trimmer (YouTube), I know when I ordered I would have loved to see a video of it in action. I can't say enough great things about this trimmer, and the customer service was great too!
Cutterpillar Trimmer Demo

Wednesday, December 28, 2011
Friday, December 23, 2011
Gate Fold Card
Every Christmas and special occasion my husband and I make each other a gift. Sometimes its a mini album, or a card but we try to make something special for the other one. I love that my husband takes the time to make me something special although he usually complains its not as nice as mine. This year I think my husband is trying out do me. He made me a 6x6 Easel Card and even put a present that opens inside of it. He took my idea for the snowman and ran with it, notice that the man has a Windsor knot on his tie! Here is his card:


Here is the card on the inside with the present that opens (there was a special message for me)

For my card to him, I decided to make a gate fold card, I don't know what this kind of opening is called but it really looks nice and is now one of my favorites. The ovals are attached on opposite sides and come together to lock the card closed.

Card opening

Products used:
Spellbinders Ovals
Spellbinders Big Scalloped Ovals
CTMH Stamps and ink
Monday, December 19, 2011
Old is new challenge
On the CC focus group we were challenged to create something with older out of date supplies. I have to admit that some of the things that were mentioned I had never heard of. I got started in 2007 and my old stuff consisted of CM shape maker tools which I hardly use but they are still going strong. I created a tag and I used an eyelet and twistel (I think it was old when I started lol). The rest of the tag is more modern with MME Lush, EP Spring time, and MME Fine and Dandy stamps. I had never used the twistel but I liked it and I think I am going to try it again.

Products used:
MME Lush
MME Fine and Dandy Stamps
MM Twistel
EP Spring Time
Wednesday, December 14, 2011
I'll Love you forever
One of my daughters favorite stories is "Love you forever" by Robert Munsch. She loves to read that story and the first time I read it to her I cried. She was so sweet and couldn't understand why I was crying but she always tells me:
"I'll love you forever, I'll like you for always, as long as I'm living my Mommy you'll be"
and I tell her:
"I'll love you forever, I'll like you for always, as long as I'm living my baby you'll be"


I submitted this layout for the Spellbinders DT contest, and I am sad to say I didn't make it to the second round. They were such a gracious company and sent a personal email to each and every applicant, which when you consider that they must have received hundreds of entries is astounding. I love this layout and I am proud of it. I have also discovered a new love of AC Glitter paper, it cuts so nicely with the spellbinders and it is really thick.
I will try again next year because I love their dies and they would be a great company to design for. My husband will now go back to worrying about the new releases because I always want them all. He is always so sweet and gets me some, what a sweet husband I have and I am truly blessed.
Products Used:
Spellbinders Flying Beauties
AC Glitter Paper
MME Lime Twist Paper
Saturday, December 10, 2011
Christmas Cards
The cards are finally finished and in the mail, so now I can post them. I love how these turned out and I really wish I had gotten more of the MME Lush paper when I had the chance. When my family saw these I got orders for more, so I am now down to my last sheet. I cut the cirlces using spellbinders large circles, they were the perfect space between sizes for what I needed, and the tickets were actually one stamp but I cut them apart and got 3 different cards. I am very happy with how these turned out, but now I want more of the paper. When I got it I liked it but had no idea how to use it and now I wish I had gotten more.
Inside

Version 1

Version 2

Version 3

Products Used:
MME Lush Paper
Stickles
Unity Stamps
Spellbinders Circles
Monday, December 5, 2011
Christmas Cards Sneak Peak
I have a confession to make, even though I love making cards I never give Christmas cards. I don't know why I never do but this year I am turning over a new leaf. These are the cards I am making for the Crop Chocolate design team. I used the MME Red Flocked Lush paper, and it looks so nice. I didn't plan on using it for Christmas cards but it works so well. I guess sometimes you find Christmas paper in the most unlikely of places. I will post pictures of the finished cards when the girls have received theirs. It seems like most of my latest projects have to wait for something before I can post them lately but I have been very busy crafting.


Wednesday, November 30, 2011
Punch Storage
I love scrapbooking tools, and my first ones were punches. They were inexpensive, easy to get and seemed so versitile when I was first starting out. I still use them and they do come in handy, but if I was honest I would say my 5 year old daughter uses them the most. I heard about the idea of using a shoe holder to store them and what a great idea, I put cards on the front of each pocket to show what was inside (note to self: teach daughter to put them away neatly).


Monday, November 28, 2011
Another Criss Cross Card
Hope you don't mind me sharing another one of these cards, they are one of my favorite cards to make. In my case both of the kids birthdays are in November and what I do for one I have to do for another, right? I made this card with the 6x6 MM Portebello Road pad. I used stars as embellishments but I have to confess I have a hard time with boy stuff. Apparently flowers are too girly but I am tired of using stars too (I never get tired of flowers, but there are so many). He is a toddler so a bit too old for baby stuff and a bit too young for little boy stuff.


Products Used:
MME Portebello Road
Spellbinders Labels 1
Spellbinders Stars
Sunday, November 20, 2011
Criss Cross Card
I love making criss cross cards, there is something about them that I love. Recently my daughter complained to me that I don't make her nice cards. She had just finished making me some beautiful cards, and she asked me why I never made her nice ones. She has seen some I have made for various occasions and would always ask for the card and I would have to say no. When I saw the MME Market Street 6x6 pad I just knew it would be perfect for my daughter;s birthday card. She just turned 5 (where does the time go) and she loved it.


Here are the directions and here is the video
Criss Cross Card Instructions


Here are the directions and here is the video
Criss Cross Card Instructions
Supplies:
1-8.5 x 11 piece of CS
1-5.25 x 4 piece of paper
1- 5.25 x 4 piece of double sided CS (or two single sided)
Other Embellishments as desired
Cut the 8.5 x 11 card stock in half at the 4.25 mark.
Take each of your pieces and score them half along the long edge at 5.5
Line up the corners of the inside score mark and the outside corner (this should make a triangle) and cut along the diagonal. Do this for both pieces
Add adhesive to the rectangle portion of one piece and then place the second piece (rectangular portion) on top. Make sure that the long ends of the triangle pieces are on the same side (top or bottom)
Cut the double sided paper in half along the diagonal.
Adhere one side to one triangle and turn over and do the same for the other triangle but you will need to turn it over. Note: If you used single sided CS you will need to cut two rectangles and cut each on the opposite diagonal for the paper to match the triangles of the card.
Add adhesive to the bottom of one triangle portion and glue down, do the same for the other
Cut and embelish a piece of 5.25 x 4 card stock to use for the insert and decorate as desired.
Decorate the rest of the card as desired, I tied a ribbon on the front and used die cuts on the top for a tab pull.
Products used:
MME Madison Ave
Spellbinders Floral Doiley Motifs
Products used:
MME Madison Ave
Spellbinders Floral Doiley Motifs
Monday, November 14, 2011
Thankful
The CC focus group had a challenge to do a project with the theme "Count your Blessings" and I did one too. When I saw the Challenge on the My Minds Eye blog I just knew it would be perfect. I followed the sketch and created a pocket to put my blessings in. I love all the glitter in the Madison Ave paper and the ribbon even has glitter too. I am a bling junkie and the Lost and Found Collections are my favorite the glitter is so beautiful and the trims are just gorgeous.
Here is my layout


Here is my layout

Here is the pocket

Here are the tags in the pocket

Here is the sketch

Products Used:
MME Madison Ave Paper and Embelishments
Spellbinders Scallop Circles
Spellbinders Circles
Stickles
Friday, October 28, 2011
Paper Pumpkins
I have always wanted to try these, so when I was asked to make a Halloween project I thought I would try one. They are actually easy to make, I used two 6x6 pieces of BG Indian Summer and cut it into 1/2" strips. Next I inked all the edges and then used two brads to hold them on each end. I cut the leaves from Spellbinders Foliage dies and made some thin strips for tendrils on the pumpkin.

Products used:
Distress Ink
Spellbinders Foliage
BG Indian Summer
Monday, October 24, 2011
Happy Birthday Card
For the latest Crop Chocolate focus group project we had to do something with stitching. I have never stitched on a project before and was really looking forward to trying it but my sewing machine was MIA. I loaned it to someone and I wasn't able to get it back in time but I had a pack of stitched letters from a hot chocolate so I used those. I used the MME flocked paper and EP Robins Egg card stock to make the base of the card. Hopefully I can get my machine back soon because I had a really cool idea I wanted to try.
 Products used:
MME Lush
EP Springtime Robins Egg Cardstock

MME Lush
EP Springtime Robins Egg Cardstock
Wednesday, October 12, 2011
Shutter Card Album Tutorial
After I made the shutter card I saw a picture of something called a shutter card album. I did mine a bit differently then the one I saw and I wish I could remember where I saw the other one and if I find it I will link the original. But here is version of a shutter card album


Here are the instructions and a link to the video
Shutter Card Open/Standing


Close up of the Left Side

Shutter Card Middle

Shutter Card Open

Shutter Card Closed

Here are the instructions and a link to the video
Supplies:
Paper trimmer
Scoring tool
2 - 12x12 sheets of card stock
Patterned paper to decorate (used MME 6x6 Lost and Found Madison Ave)
Crystal Stickles
Bling
Magnet for closure (you could also use ribbon or velcro)
Cut the first sheet of card stock in half, you will make 2 shutter cards for the bases.
Take the card stock horizontally (long side) and score it at the 2”, 4”, 8”, and 10” marks.
Turn the card stock 90 degrees and cut between the 2” and 10” score marks 1 ½” in on each side, you will have 3 sections of the card but it will be in one piece. Fold the score lines so that front and back are a sideways “T” and the other flaps tuck in behind.
To do this you will fold as follows: Take the middle section and fold the second score line out (mountain) and the next one in (valley). Note you will fold at 4”, and 8” marks.
One the top and bottom sections you will fold on all score lines the first score line fold will be out (mountain), and then in (valley), and then out (mountain) and then in (valley) again. Note you will fold at 2”, 4”, 10”, and 12”.
When the card is closed it will be 6” by 4”, so if anything is sticking, chances are something is folded the opposite direction.
Repeat for the other 12"x6" piece, these will be the base of the album
Cut the other 12"x12" piece of card stock in half, from one of the 6"x12" pieces cut it in half. Take each piece and score it at the 2" mark (these are the covers of the album)
Take the other 6"x12" piece and cut at 4", you will have a 4"x6" piece and a 8"x6" piece
Put the two "cards" side by side and open them up, then adhere the 4x6 piece of card stock in the middle (where the two back panels meet in the middle)
Fold the 6"x6" piece at the 2" score line and adhere to the front panel with the flap of the 6"x6" piece going behind the flap on the front, repeat for the other side.
Attach a die cut to the front for the closure, if you are using magnets apply before decorating, if you are using ribbon add the ribbon to the back.
Adhere the 6x8 piece of card stock to the back
Decorate the album as desired.
Products used:
MME Madison Ave Paper
Spellbinders Fleur de lis Pendants
Spellbinders Butterflies 2
Stickles
Distress Ink
Products used:
MME Madison Ave Paper
Spellbinders Fleur de lis Pendants
Spellbinders Butterflies 2
Stickles
Distress Ink
Friday, October 7, 2011
Cute as a Button
This is a layout I made of some old fashioned pictures we had done of my daughter a couple of years ago. They were done by a company that came to Sam's Club and I wish they would come back. Two years ago Walmart pulled the plug on Sam's Club in Canada and all the stores were closed in a week. My daughter used to love going there and everytime we drive by she says "I miss Sam's club". She was 2 when they closed and I am surprised she still remembers but she loved to take her doll stroller when we went and she would go shopping with her "baby".


Products Used
Spellbinders Labels 1, MME Stella and Rose Paper, Lace Trim
Thursday, September 22, 2011
Another gift card holder
A friend is having a baby boy and we gave them a gift card on top of the baby items. I made another one of these gift card holders I love how this turned out. I also used it for a challenge for the CC Focus Group were had to make our own embellishment. I made the rosette on the front and the rest came together easily.


Close up of the Rosette

Inside

Gift card holder closed

Products Used:
MM Pitter Patter Paper
Spellbinders Stars
Spellbinders Scallop Cirlces
Monday, September 19, 2011
New Embellishment Storage
A while ago I saw someone show how they used a curtain rod and drapery clips to create a homemade version of the clip it up. Recently I went to Ikea and saw this Grundtal rod in the kitchen department. I got one and bought a spice rack holder and a bunch of the Rajtan spice jars (4 for $4.00). I haven't filled all the jars yet but I love this. I need more curtain clips but they work so well for holding up misc embellishments and I can't wait to fill those jars with flowers.


Thursday, September 15, 2011
Pages for a Cause
I made these pages for a girl on crop chocolate who put out a request to help make two albums for two young boys who were in the process of losing their father. She wanted to put together albums for them with pictures of them and their father. I kept them simple and non themed, but left room for a title if she wanted to put one over the stars. The story broke my heart and my prayers go out to the family during this difficult time.
There is room for 6-4x6 photo's if she chooses, since she is putting together two albums I wanted to make it flexible for her and even she doesn't know what the photos will be. You can't see it in the picture but I distressed the top edge of the black at the bottom.
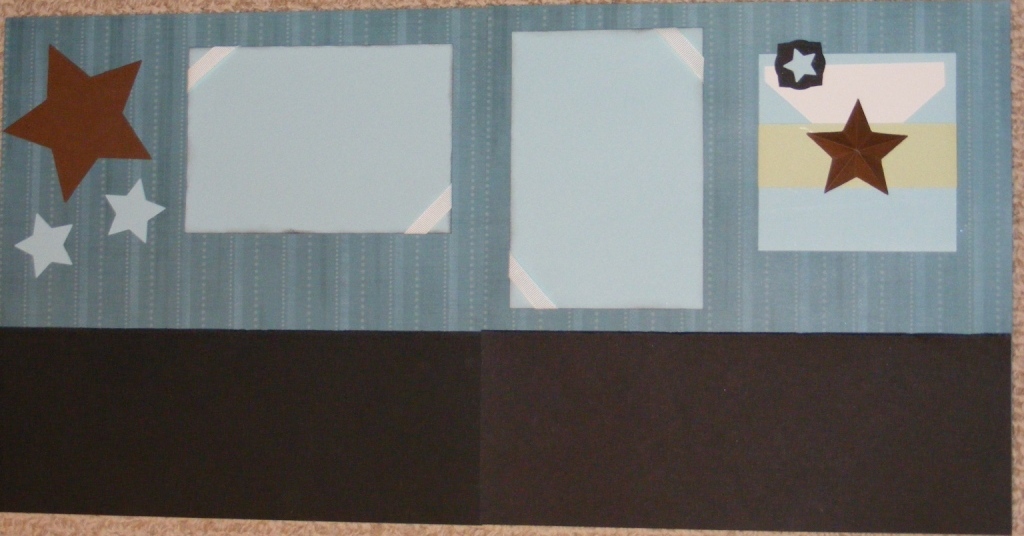
Here is a close up of the journaling pocket, this way she can put as much or as little as she needs

Spellbinders Stars
Spellbinders Labels 3
CTMH Paper
Sunday, September 11, 2011
Crop Chocolate - September Project 3D Stars
For my September project for crop chocolate we had to use this sketch made by D2


I did a tutorial on how to make the stars, I love using them on my sons's album since flowers seem to be out for some reason :)
Instructions for stars
1. Cut out a 5 point star
2. Score each point in the middle (5 times)
3. Crease each score line with a bone folder
4. Fold the star along the score lines (this will help shape the star)
5. Unfold the star and shape as necessary
6. Put a foam dot in the middle of the star (on the bottom) and place a thin line of glue along the edge of the entire star. The foam dot will help the star keep its shape.
Here is the Video
Attention Sweetpea1077, can you please contact me about your blog candy? I will draw a new winner on September 14th, if I don't hear from you.
Products used:
MM Pitter Patter Paper
Spellbinders Starts

This is what I came up with


I did a tutorial on how to make the stars, I love using them on my sons's album since flowers seem to be out for some reason :)
Instructions for stars
1. Cut out a 5 point star
2. Score each point in the middle (5 times)
3. Crease each score line with a bone folder
4. Fold the star along the score lines (this will help shape the star)
5. Unfold the star and shape as necessary
6. Put a foam dot in the middle of the star (on the bottom) and place a thin line of glue along the edge of the entire star. The foam dot will help the star keep its shape.
Here is the Video
Attention Sweetpea1077, can you please contact me about your blog candy? I will draw a new winner on September 14th, if I don't hear from you.
Products used:
MM Pitter Patter Paper
Spellbinders Starts
Tuesday, September 6, 2011
Blog Candy Winner-sweetpea1077
I used Random.org to chose the winner and the lucky number was 19. Congrats to sweetpea1077, please send me an email at xxxxx@xxxxx with your mailing information and I will send you your blog candy. Thanks to everyone who entered, I will have some more again so check back later.
Saturday, August 27, 2011
Crop Chocolate Blog Candy
As promised here is my Crop Chocolate blog candy. I was waiting for my recent order to come in because I am including a MME Stella & Rose 6x6 pad. The papers in this are so pretty and I hope that the full 12x12 comes to Crop Chocolate too. Aside from the 6x6 pad the rest of the blog candy is from various hot chocolate grab bags I have gotten. All you have to do to win is follow my blog (there is a link on the right side) and leave a comment on this post. I will draw a winner on Monday September 5th good luck to everyone. Please note that this is open to people in the US and Canada.
Blog Candy Contents:
MME Stella and Rose 6x6 Pad
Sassafras Fabric covered brads
MM Passport Label Fetti Stickers
MM Glitter Bling Baseball
MM Noel Rubons
MM Felt Alpha Stickers
MM Mistletoe Glitter Expoxy Stickers
MM Toil & Trouble Chandelier Beads

Please note this is not sponsored by Crop Chocolate, but if stuff I have gotten from them which is why I am calling it Crop Chocolate blog candy
Wednesday, August 24, 2011
Tri Shutter Card
The August design team challenge for the Crop Chocolate design team was to do something we had never done before. I chose to make a tri fold shutter card and I love how it turned out.
Card Open


Front Panel

Back panel

Supplies:
5 ½” x 12” card stock
Scoring tool
Pattern paper (MME So Sophie Paper)
Embellishments
Craft knife or sliding blade trimmer
5 ½” x 12” card stock
Scoring tool
Pattern paper (MME So Sophie Paper)
Embellishments
Craft knife or sliding blade trimmer
Instructions:
Take the card stock horizontally (long side) and score it at the 2”, 4”, 8”, and 10” marks.
Turn the card stock 90 degrees and cut between the 2” and 10” score marks 1 ½” in on each side, you will have 3 sections of the card but it will be in one piece.
Fold the score lines so that front and back are a sideways “T” and the other flaps tuck in behind.
To do this you will fold as follows:
- Take the middle section and fold the second score line out (mountain) and the next one in (valley). Note you will fold at 4”, and 8” marks.
- One the top and bottom sections you will fold on all score lines the first score line fold will be out (mountain), and then in (valley), and then out (mountain) and then in (valley) again. Note you will fold at 2”, 4”, 10”, and 12”.
- When the card is closed it will be 5 ½” by 4”, so if anything is sticking, chances are something is folded the opposite direction.
Blog Candy Update: I am expecting my package in the next day or two and when I do I will post some blog candy. I was hoping it would be here already but it got stuck in customs. Check back soon.
Products used:
MME So Sophie Paper
Spellbinders Flying Beauties
Spellbinders Labels 10
Bling
Monday, August 22, 2011
Ducks go out to play
I was going through my pictures and realized I never posted a picture of the focus group project I made when the Crop Chocolate focus group was set up. I made this layout because I loved the "Ducks go out to play" news paper clipping from the pitter patter line and it matched the picture so well. When my daughter was a baby I had her pictures done once a month at the local studio when they would have a walk in special for $8. She was such a sweet baby and loved getting her picture taken. I did the same for my son because I didn't want the picture comparison when they got older. Plus I am much better at scrapbooking then when I first started so his album will probably be nicer.

Blog Candy Alert !
I just wanted to give a heads up about blog candy, I am waiting for my current Crop Chocolate order to come in and then I will post some blog candy so stay tuned because it should be this week sometime.
Products used:
MM Pitter Patter Paper
MM Pastel Brads
Spellbinders Labels 14
Spellbinders Lacey Circles
Bling
Friday, August 19, 2011
Inspiration Challenge
On the the crop chocolate focus group there was an inspiration challenge. You had to create a project, layout, card, etc with 75% crop chocolate product that was inspired by the picture. Here is the inspiration picture

Two things popped out at me when I saw the picture and that was the butterflies (I love them) and the collage. I saw remember seeing a collage frame with butterflies somewhere (sorry but I don't remember where) and I always wanted to try it. When I saw this challenge I figured it was the perfect time to try. I used MME So Sophie paper, distress ink, perfect pearls, and bling (cut apart a MM shape from my hot chocolate). Here is my project unframed (note to self: its hard to take a picture of something framed). I put it in a shadow box for my daughters room and she loves it.

Products used:
MME So Sophie Graceful
Spellbinders Flying Beauties
Spellbinders Labels 1
Bling
Thursday, August 11, 2011
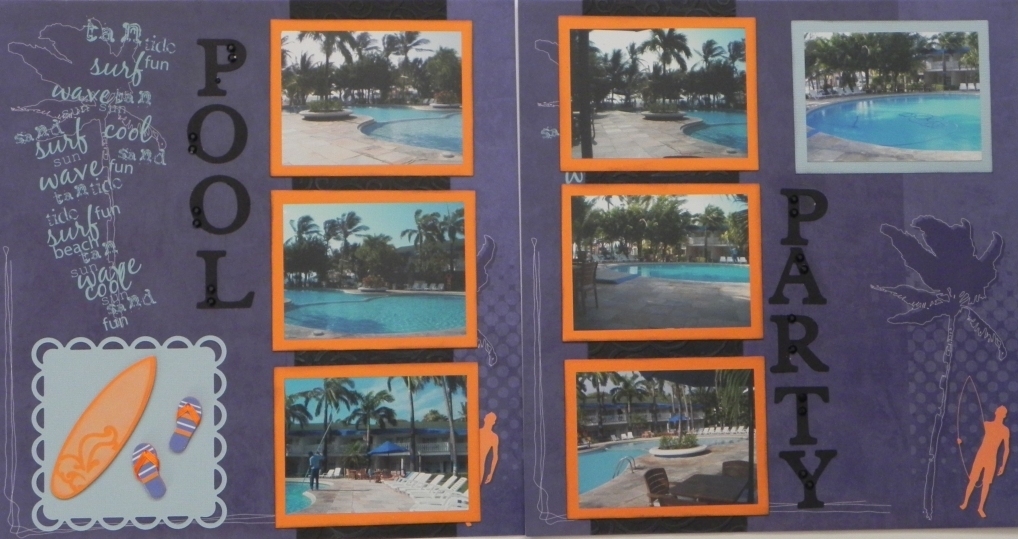
Bling it up
I discovered that after finishing my daughters album that I get tired of doing one project so I have been working on my son's baby album and also an album from a vacation we took 2 years ago. This layout is from our vacation and it is a bunch of pictures from the pool were we stayed. I made this for the "Bling it up" challenge at http://scrapaddictsattic.blogspot.com/2011/08/official-crop-chocolate-blog-hop.html. I am a bling junkie and I have been putting rhinestones and a mist made from Perfect Pearls on everything. I can just see the kids going through my albums when they are older and saying "that is from mom's glimmer phase". I even used it on some die cut lizards for a different layout (nothing is safe around me). For this challenge I used rhinestones on the letters and I sprayed my mist on the black strips behind the pictures. My camera battery died after taking this picture so I don't have any closeups but it is really pretty and glimmery. I was happy with how this turned out even though I hate the colour orange it turned out really nice (it went with the paper so that's why I used it).

Products Used:
Spellbinders Lacey Squares
Spellbinders Beach Party
Bling
Products Used:
Spellbinders Lacey Squares
Spellbinders Beach Party
Bling
Subscribe to:
Posts (Atom)